
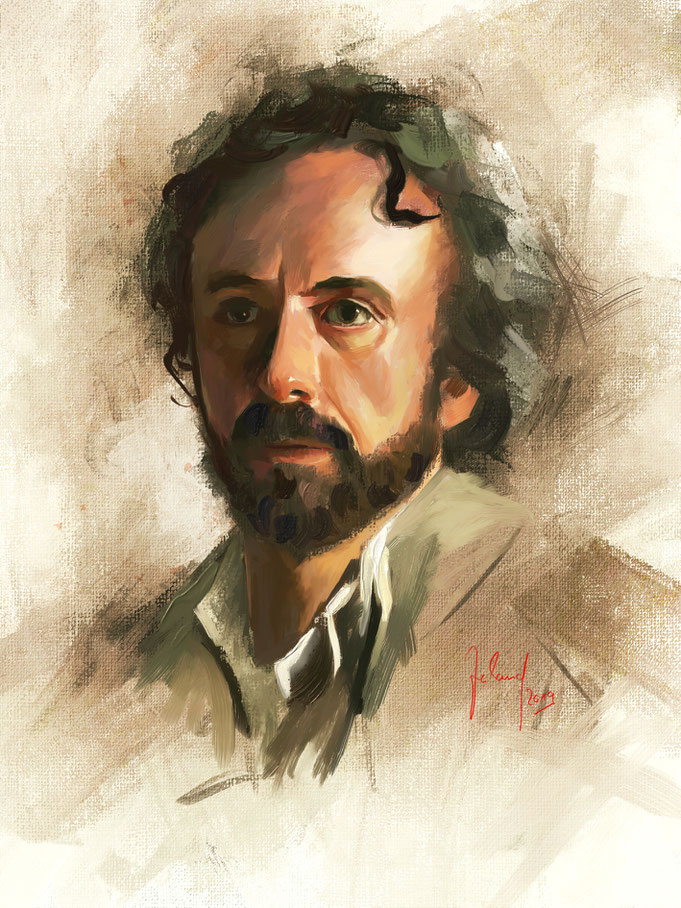
Dieses Portrait habe ich so gemalt, wie ich es auch in der traditionellen Ölmalerei gemacht hätte, beginnend mit einem mageren Farbauftrag, der fortschreitend immer fetter wird und von dunkel nach hell arbeitend, nur halt mit digitalen Pinseln und digitaler Farbe. Gerade die Wechselwirkung von mager und dünn aufgetragener Farbe zu fettem und sattem Farbauftrag finde ich sehr reizvoll.
Digital bediene ich mich eines kleinen Tricks, um diese Wirkung zu erzielen. Für ein digitales Ölgemälde sind das meine Standardeinstellungen:
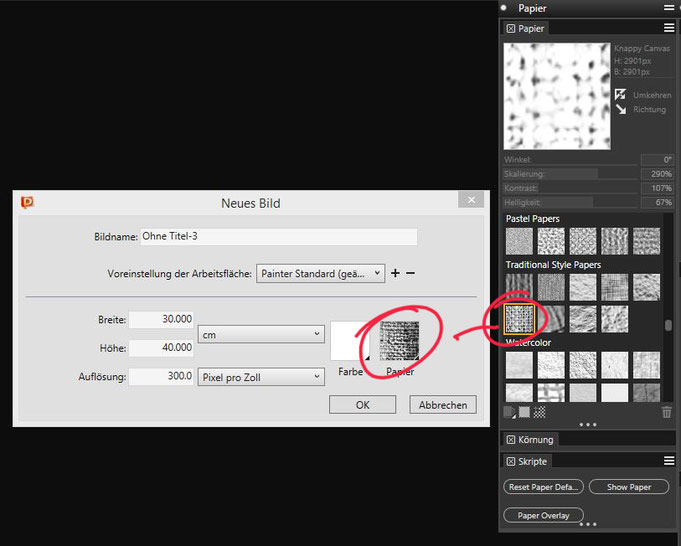
Ich öffne ein neues Dokument und suche mir eine traditionelle Leinwandstruktur aus.
I painted this portrait as I would in traditional oil painting, starting with a lean application of paint, progressively getting fatter and working from dark to light, just with digital brushes and digital paint. Especially the interaction of lean and thin applied color to fat and rich color application, I find very attractive.
Digitally I use a little trick to achieve this effect. For a digital oil painting these are my default settings:
I open a new document and choose a traditional canvas structure.
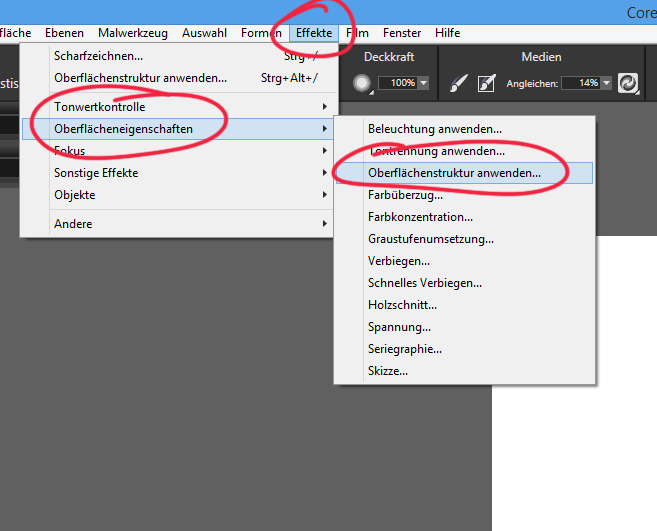
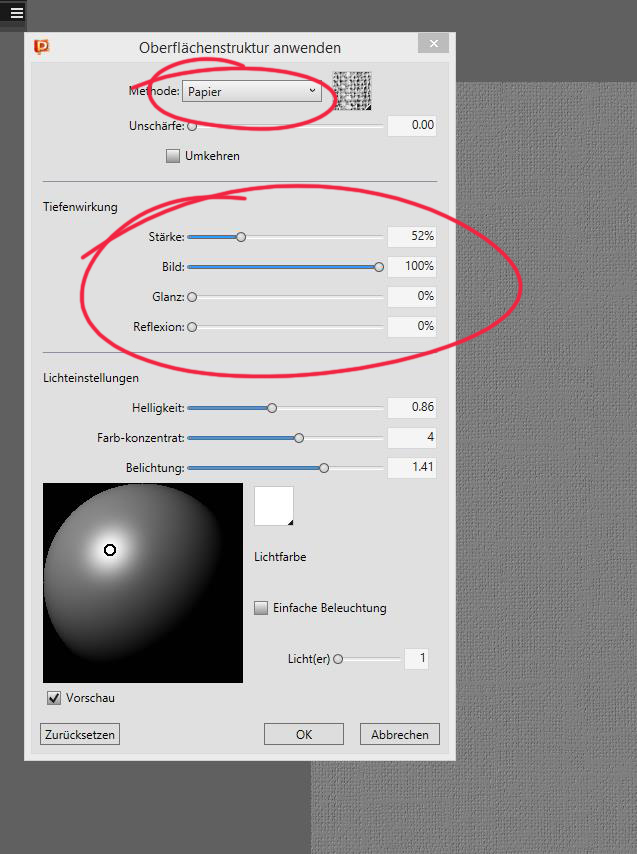
Dann gehe ich im Menu auf Effekte - Oberflächeneigenschaften - Oberflächenstruktur anwenden...
Then in the menu I go to Effects - Surface Control - Apply Surface Texture...
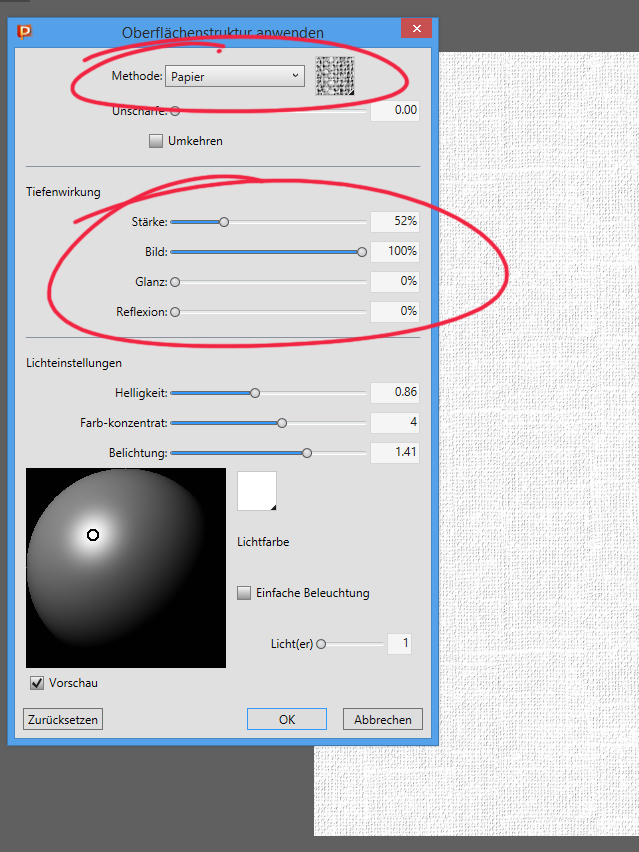
In dem erscheinenden Dialog nehme ich die Einstellungen in den markierten Feldern vor und klicke auf OK
In the appearing dialog I make the settings in the marked fields and click on OK
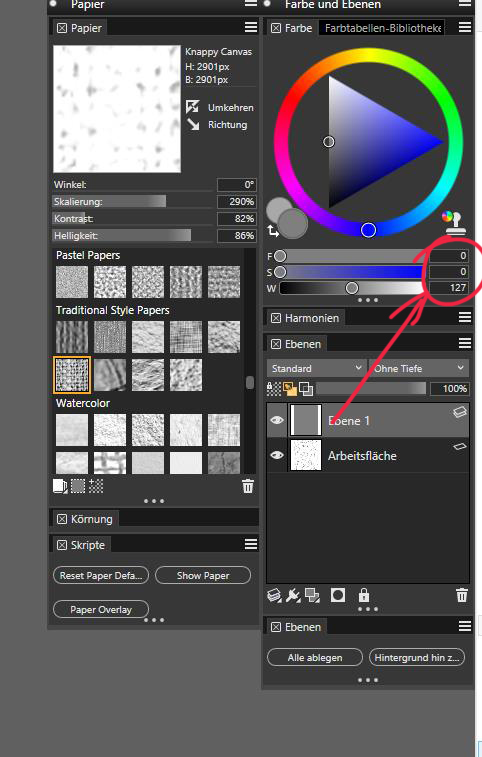
Jetzt habe ich die Leinwandstruktur auf der Arbeitsfläche. Ich füge eine weitere Ebene ein und fülle die Ebene mit einem möglichst exakt Mittelgrau (Tonwert bei 127)
Now I have the canvas structure on the canvas layer. I add another layer and fill the layer with a middle gray (tone value 127)
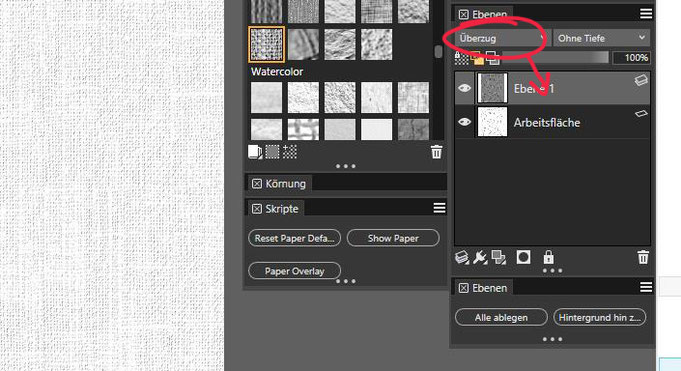
Auf dieser Ebene wiederhole ich jetzt die Schritte von eben, Effekte - Oberflächeneigenschaften - Oberflächenstruktur anwenden, und übernehme die gleichen Einstellungen in dem Dialog.
On this layer I repeat the steps from before, effects - surface controls - apply surface structure, and accept the same settings in the dialog.
Das Montageverfahren dieser Ebene setzte ich auf Überzug, so dass nur die Leinwandstruktur zu sehen ist.
The Blend Mode of this layer, I set to Overlay, so that only the canvas structure is visible.
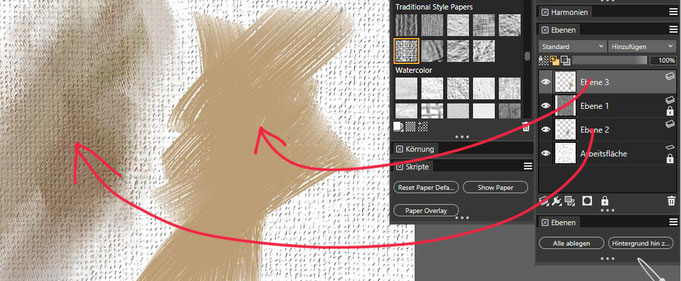
Zwischen der Arbeitsfläche und Ebene 1 und oberhalb der Ebene 1 füge ich weitere Ebenen ein. Wenn ich jetzt unterhalb der Ebene 1 male, erscheint der Farbauftrag mager, weil die Leinwandstruktur der Ebene 1 durchscheint. Wenn ich oberhalb der Ebene 1 male ist der Farbauftrag fett, da die Leinwandstrukturen Der Arbeitsfläche und der Ebene 1 überdeckt werden.
Between the canvas layer and layer 1 and above layer 1 I add further layers. When I paint below Layer 1, the paint will look lean because the canvas structure will show through. When I paint above layer 1, the paint will be saturated, as the canvas structures of the canvas layer and layer 1 are covered.
Für alle, die das mal ausprobieren möchten, hier die Beschreibung noch einmal als herunterladbares PDF.
For those who want to try it out, here is the description as a PDF to download.
So jetzt kann es losgehen: Als erstes töne ich mit lockeren Pinselstrichen die Leinwand mit einem mittleren Grauton. Darauf setze ich mit einem Pinsel die erste Zeichnung und versuche die dunkelsten Bereiche zu finden. Der zuerst aufgetragene Grauton dient zunächst für die mittleren und hellen Töne.
In einem weiteren Schritt versuche ich die hellen Bereiche zu finden, verstärke die dunkeln Bereiche und korrigiere die Proportionen, wo nötig. Dabei kontrolliere ich ständig Abstände und Winkel der Gesichtszüge, um eine möglichst korrekte Grundlage zu haben, bevor die farbliche Ausarbeitung beginnt.
Bis hierhin habe ich "mager" auf der Ebene 2 unterhalb der Ebene 1 mit der Leinwandstruktur gemalt. Danach werde ich nur noch auf der obersten Ebene, oberhalb der Leinwandstruktur malen.
Übrigens, wenn Ihr auf die Bilder Klickt, könnt Ihr diese vergrößert betrachten.
So now I can start: First, I tone the canvas with loose brushstrokes with a medium gray tone. Then I set the first drawing with a brush and try to find the darkest areas. The first applied gray
tone is used for the middle and bright tones.
In a further step I try to find the bright areas, reinforce the dark areas and correct the proportions where necessary. In doing so, I constantly check the distances and angles of the facial
featuress in order to have the basis correct as possible before I apply more colour.
So far I have painted "lean" on level 2 below level 1 with the canvas structure. After that I will only paint on the top layer, above the canvas structure.
By the way, if you click on the pictures, they can be viewed enlarged.


In den nächsten Schritten geht es darum, die richtigen Farbtemperaturen und Farbwerte zu finden, und die Details auszuarbeiten.
Within the next steps I try to find the right color temperatures and color values and work out the details.


Zuletzt habe ich im Haar und im Bart, sowie auf der Kleidung noch einige Akzente mit dicker Farbe gesetzt.
Lastly, I have added some accents in the hair and the beard as well as on the clothing with thick paint.
Für die, die es interessiert: Ich habe im wesentlichen mit meinen IR Flachpinsel, die ich in einem früheren Blog zum Herunterladen zur Verfügung gestellt habe, gemalt. Nur zum Schluss habe ich noch mit Pinseln der Kategorie "Dicke Farbe" gemalt.
For those who are interested: I basically painted with my IR flat brushes, which I provided in a previous blog for download. Only at the end I painted with brushes of the category "thick paint".
Und wenn ihr wollt, könnt ihr mich hier unterstützen:
And if you want to support me, you can do it here:

Kommentar schreiben
Fisher (Sonntag, 18 August 2019 23:09)
Georg, this is brilliant, what a beautiful portrait, so well painted. The explanation on your working methods is wonderful. Thank you so very much. Bob Fisher
Marci (Montag, 19 August 2019 13:38)
Georg this is fabulous and will help me so much as I continue my quest of painting better portraits, thank you so very much!!!
Colleen Taylor (Montag, 19 August 2019 16:39)
Georg, this is absolutely wonderful and a great deal of help. Thank you for the explanation of your methods of painting. This is a considerable amount of work to give back. You are able to create a method in which I strive in portraits! Thank you!
Cheryl (Montag, 19 August 2019 21:34)
Thank you Georg. Your explanation of how to get the look of fat over lean was really helpful. I admire the way you paint. The colors, the harmony , the brush strokes are all beautiful. While this is unique to you, there is much that I would love to learn about your techniques.
Betty Piper (Dienstag, 20 August 2019 17:05)
Thank you so much. Your explanation was very easy to understand . I appreciate the idea of painting above and below the canvas layer. I have done this before but never fully understood the effects until seeing your blog post today. I can see it being useful in other painting mediums too.
Kathleen Casey (Dienstag, 20 August 2019)
Great work here Georg, I really enjoy seeing your steps.